perlで正規表現を使う。
ファイルのデータを読み込んで、変換してからファイル出力をしたい。
そのための第一歩。
以下が読み込むファイル。
あいうえお	かきこけこ
さしすせそ	なにぬねの
そして以下がプログラム。これに改行タグをつけたい。
use strict;
use warnings;

#読み込むファイルを指定
my $file = 'data.txt';

#読み込んだファイル一行ごとの参照を格納する配列
my $recs = [];

open(my $fh, "<", $file)
  or die "Cannot open $file: $!";

# readline関数で、一行読み込む。
while(my $line = readline $fh){
    # chomp関数で、改行を取り除く
    chomp $line;

   #一行をタブで分割し、配列に格納する。
   my $items = [];

    @$items = split(/\t/, $line);
      # push関数の第1引数は配列なので、@$recs

#一行ごとの参照をrec配列に格納する。
    push @$recs, $items;
}

close $fh;

#一行づつ取り出す。
for my $items2 (@$recs) {
  # カンマで連結して出力。

#列ごとのデータを取り出し、あ→ら、な→り に変換する。
$items2->[0] =~ tr/{あ}/{ら}/;
$items2->[1] =~ tr/{な}/{り}/;

  print $items2->[0];
  print $items2->[1];
}

perlのcpanをためす。
テキストファイルからhtmlファイルを作成するプログラムを作成しようと思う。
手段はperlのcpanを使いたい。cpanというのは別の人が作ったプログラムモジュールを読み込んで自分のプログラムから利用するための環境。これを使うと早く目的を達成できるよう。
まずperlの環境をインストール。active perlをインストールする方法もあるが、最近はStrawberryPerlをインストールする人も増えているらしい

ここで以下のリンクをクリック
Jan 2014 Strawberry Perl 5.18.2.1 (64bit)
ダウンロードしたデータを実行、基本的に「次へ」。環境変数も自動的に設定される。
次はcpanのモジュールのダウンロードとインストール。
必要はものについて随時行うスタイル。
今回は、HTML:Template モジュールのみ行います。
これは、htmlのテンプレートファイルの中にある変数に、プログラムから値を設定できるようにするものです。
以下の画面を参照。
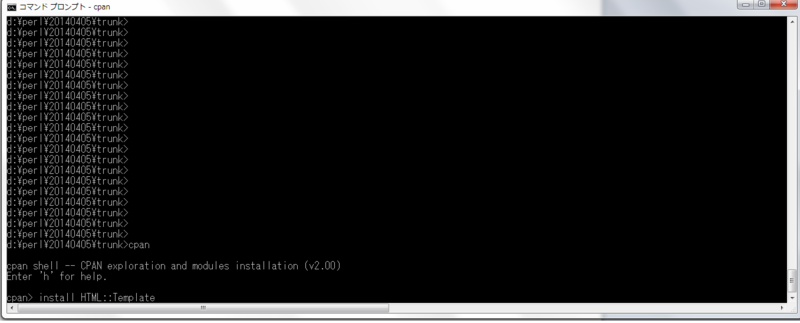
d:\perl\20140405\trunk>cpan
cpan shell -- CPAN exploration and modules installation (v2.0
Enter 'h' for help.
cpan> install HTML::Template
以上で環境の準備は完了。
今回は2ファイル作成します。
一つはテンプレートファイルのhello.tmpl
<html>
<head><title>HTML::Template Test</title></head>
<body>
<h1>HTML::Template Test</h1>
<p>私の名前は <TMPL_VAR NAME="NAME"> です。 <TMPL_VAR NAME="PER"> に住んでいます。
</p>
</body>
</html>
もう一つはperlプログラムのcpantest20140407.pl
use strict;
use HTML::Template;
use warnings;
#use utf8;

my $tmpl = HTML::Template->new(filename => 'hello.tmpl');

$tmpl->param(
  NAME => "ゆうすけ",
  PER => "神奈川県",
);

print "Content-Type: text/html\n\n", $tmpl->output;
なお、両方ともsjis形式です。
そうしないと文字化けを起こすため。
これらを実行すると、以下の出力結果を得られます。

d:\perl\20140405\trunk>
d:\perl\20140405\trunk>perl
Content-Type: text/html

<html>
<head><title>HTML::Template
<body>
<h1>HTML::Template Test</h1
<p>私の名前は ゆうすけ です
</p>
</body>
</html>
d:\perl\20140405\trunk>
cpantest20140407.plから、hello.tmplの値を設定しているのがわかります。
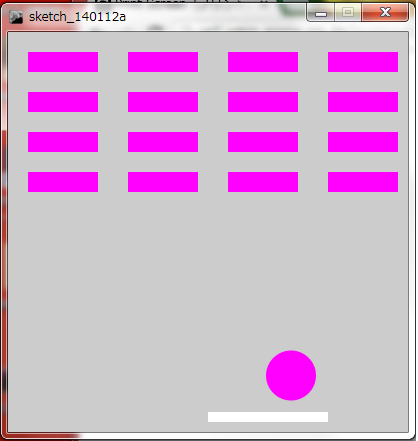
ブロックを表示
衝突の対象にするブロックを表示させる。
今回は表示させるだけだが、今後はループ文での表示、衝突時の処理、色の変化などが必要。
//しかく
float x = 200.0;
float speed = 3.0;

//まる
float mx = 25;
float my = 150;
float mvx = 2.0;
float mvy = 1.5;

//しかくの左上からの距離
float space1 = 0;

//しかくの右上からの距離
float space2 = 0;

int c_type = 0;

void setup() {
  size(400, 400);

//これは何か
  noStroke();
  smooth();
}

void keyPressed() {
  if (key == CODED) {      // コード化されているキーが押された
    if (keyCode == RIGHT) {    // キーコードを判定
          x += speed;

          if(x > 270){  //右の限界 四角の幅が120、枠の幅が400のため。
            x = 270;
          }

    } else if (keyCode == LEFT) {
           x -= speed;

           if(x < 10){  //左の限界
             x = 10;
           }
    }
  }
}

void draw() {
    background(204);
    //background(0);

    fill(255);
    //colorSet1();
    rect(x, 380, 120, 10);

    mx = mx + mvx;
    my = my + mvy;


    if(mx <= 25 || mx >= width - 25){
      mvx = - mvx;
      colorChange();
    }
    if(my <= 25){
      mvy = - mvy;
      colorChange();
    }else{
      colorSet1();
    }
    if(my >= height - 25){
      mvx = 0;
      mvy = 0;
    }

   ellipse(mx,my,50,50);

   Conflict();


   //ブロックの表示
   rect(20, 20, 70, 20);
   rect(120, 20, 70, 20);
   rect(220, 20, 70, 20);
   rect(320, 20, 70, 20);
   rect(20, 60, 70, 20);
   rect(120, 60, 70, 20);
   rect(220, 60, 70, 20);
   rect(320, 60, 70, 20);
   rect(20, 100, 70, 20);
   rect(120, 100, 70, 20);
   rect(220, 100, 70, 20);
   rect(320, 100, 70, 20);
   rect(20, 140, 70, 20);
   rect(120, 140, 70, 20);
   rect(220, 140, 70, 20);
   rect(320, 140, 70, 20);
}

void colorChange(){
  c_type = c_type%7;

  switch(c_type) {
    case 0:
        //red
        fill(255,0,0);
        break;
    case 1:
        //yellow
        fill(255,255,0);
        break;
    case 2:
        //green
        fill(0,255,0);
        break;
    case 3:
        //lightblue
        fill(0,0,255);
        break;
    case 4:
        //blue
        fill(255,0,255);
        break;
    case 5:
        //purple
        fill(255,0,255);
        break;
    case 6:
        //whihe
        fill(255,255,255);
        break;
    default:
      println("None");    // どのcaseにも該当しなかったとき
      break;
  }
    c_type = c_type + 1;
}

void colorSet1(){
    switch(c_type) {
    case 0:
        //red
        fill(255,0,0);
        break;
    case 1:
        //yellow
        fill(255,255,0);
        break;
    case 2:
        //green
        fill(0,255,0);
        break;
    case 3:
        //lightblue
        fill(0,0,255);
        break;
    case 4:
        //blue
        fill(255,0,255);
        break;
    case 5:
        //purple
        fill(255,0,255);
        break;
    case 6:
        //whihe
        fill(255,255,255);
        break;
    default:
    // どのcaseにも該当しなかったとき
      break;
  }
}

void Conflict(){

  space1 = (x-mx)*(x-mx) + (380-my)*(380-my);
  space2 = (x+120-mx)*(x+120-mx) + (380-my)*(380-my);
  space1 = round(sqrt(space1));
  space2 = round(sqrt(space2));

//平面での衝突
    if(my + 25 > 380){
      if((x <= mx) && (x+120 >= mx) ){
         //しかくとの衝突時はx方向の進む向きを変えない。
         //mvx = - mvx;
         mvy = - mvy;
      }
    }

//上角での衝突
    if(mx < x){
      if(mx + 25 > x && my <380 && space1 < 25)
      {
         mvx = - mvx;
         mvy = - mvy;
      }
    }else if(mx > x+120){


      if(mx > x + 120 && my <380 && space2 < 25)
      {
         mvx = - mvx;
         mvy = - mvy;
      }
    }
}
processingで衝突の処理の追加
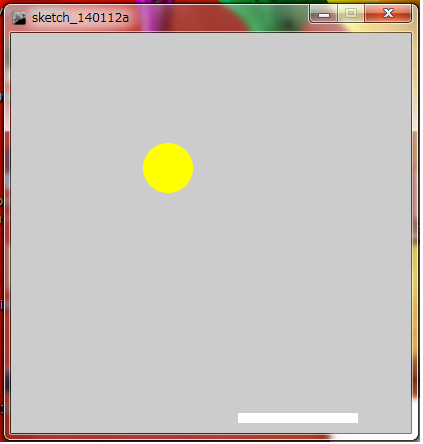
しかくとまるの衝突を上部と角に分けて記述。
また、しかくの幅を縮小、画面下部にまるが行ったらまるが止まるようにした。
//しかく
float x = 200.0;
float speed = 3.0;

//まる
float mx = 25;
float my = 150;
float mvx = 2.0;
float mvy = 1.5;

//しかくの左上からの距離
float space1 = 0;

//しかくの右上からの距離
float space2 = 0;

int c_type = 0;

void setup() {
  size(400, 400);

//これは何か
  noStroke();
  smooth();
}

void keyPressed() {
  if (key == CODED) {      // コード化されているキーが押された
    if (keyCode == RIGHT) {    // キーコードを判定
          x += speed;

          if(x > 270){  //右の限界 四角の幅が120、枠の幅が400のため。
            x = 270;
          }

    } else if (keyCode == LEFT) {
           x -= speed;

           if(x < 10){  //左の限界
             x = 10;
           }
    }
  }
}

void draw() {
    background(204);
    //background(0);

    fill(255);
    //colorSet1();
    rect(x, 380, 120, 10);

    mx = mx + mvx;
    my = my + mvy;


    if(mx <= 25 || mx >= width - 25){
      mvx = - mvx;
      colorChange();
    }
    if(my <= 25){
      mvy = - mvy;
      colorChange();
    }else{
      colorSet1();
    }
    if(my >= height - 25){
      mvx = 0;
      mvy = 0;
    }

   ellipse(mx,my,50,50);

   Conflict();
}

void colorChange(){
  c_type = c_type%7;

  switch(c_type) {
    case 0:
        //red
        fill(255,0,0);
        break;
    case 1:
        //yellow
        fill(255,255,0);
        break;
    case 2:
        //green
        fill(0,255,0);
        break;
    case 3:
        //lightblue
        fill(0,0,255);
        break;
    case 4:
        //blue
        fill(255,0,255);
        break;
    case 5:
        //purple
        fill(255,0,255);
        break;
    case 6:
        //whihe
        fill(255,255,255);
        break;
    default:
      println("None");    // どのcaseにも該当しなかったとき
      break;
  }
    c_type = c_type + 1;
}

void colorSet1(){
    switch(c_type) {
    case 0:
        //red
        fill(255,0,0);
        break;
    case 1:
        //yellow
        fill(255,255,0);
        break;
    case 2:
        //green
        fill(0,255,0);
        break;
    case 3:
        //lightblue
        fill(0,0,255);
        break;
    case 4:
        //blue
        fill(255,0,255);
        break;
    case 5:
        //purple
        fill(255,0,255);
        break;
    case 6:
        //whihe
        fill(255,255,255);
        break;
    default:
    // どのcaseにも該当しなかったとき
      break;
  }
}

void Conflict(){

  space1 = (x-mx)*(x-mx) + (380-my)*(380-my);
  space2 = (x+120-mx)*(x+120-mx) + (380-my)*(380-my);
  space1 = round(sqrt(space1));
  space2 = round(sqrt(space2));

//平面での衝突
    if(my + 25 > 380){
      if((x <= mx) && (x+120 >= mx) ){
         //しかくとの衝突時はx方向の進む向きを変えない。
         //mvx = - mvx;
         mvy = - mvy;
      }
    }

//上角での衝突
    if(mx < x){
      if(mx + 25 > x && my <380 && space1 < 25)
      {
         mvx = - mvx;
         mvy = - mvy;
      }
    }else if(mx > x+120){


      if(mx > x + 120 && my <380 && space2 < 25)
      {
         mvx = - mvx;
         mvy = - mvy;
      }
    }
}
Rでヒストグラム、散布図を作成
Rでのヒストグラムの作成方法。
まずggplotのインストールと設定が必要になります。
> install.packages("ggplot2")
> library(ggplot2)そしたらヒストグラムを作成。
> ggplot(body.data,aes(x=height,col=gender))+geom_histogram()+theme_bw(16)+ylab("count")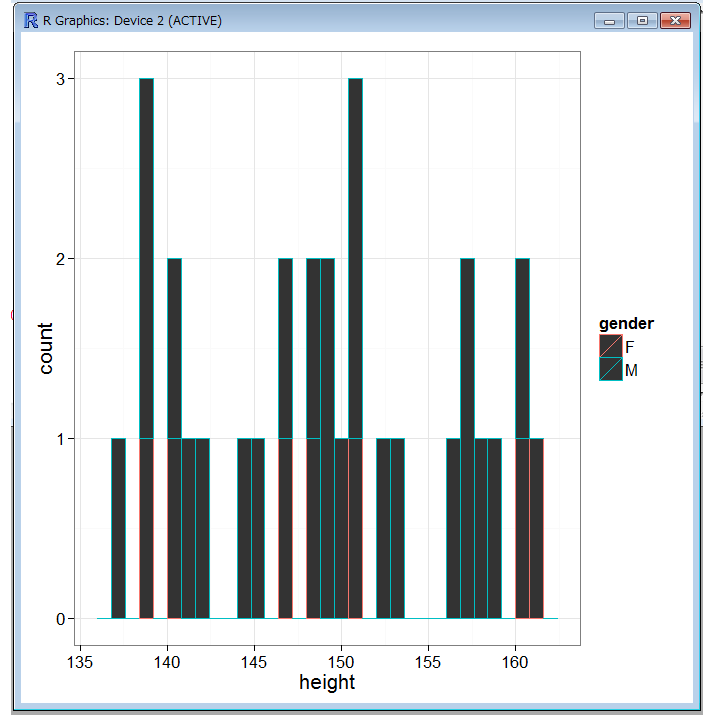
すると上のようなグラフが作成されます。
ggplot関数で読み込みデータの指定。geom_histogram関数で関数の種類、theme_bw関数で横幅、lab関数で縦の幅を指定。
次に散布図の作成。
> ggplot(body.data,aes(x=height,y=weight,col=gender))+geom_point()+theme_bw(16)+geom_smooth(method="lm")
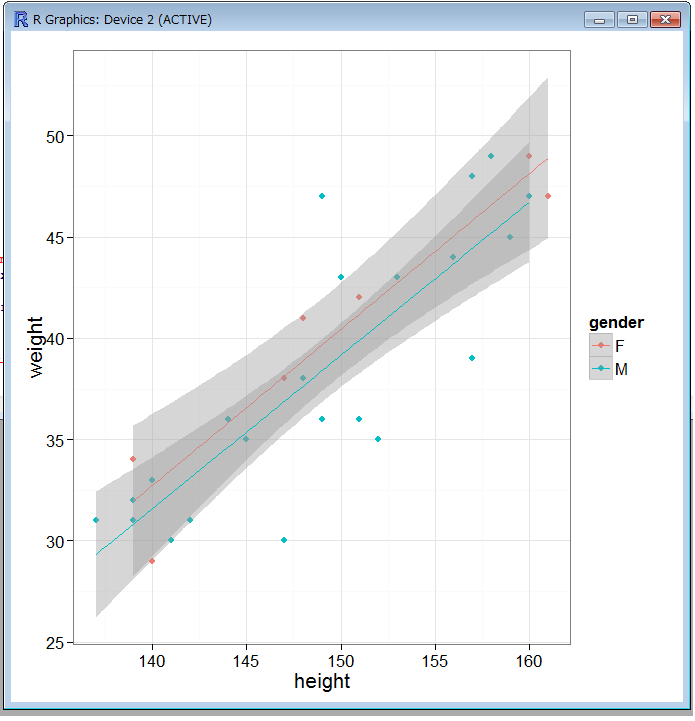
すると上のようなグラフが作成されます。
ggplot関数で読み込みデータの指定。geom_point関数で関数の種類、theme_bw関数で横幅、lab関数で縦の幅を指定。
次に相関変数の出し方。
身長と体重の相関変数を出します。
cor(body.data$height,body.data$weight)
[1] 0.8631621
1に近いほど関係が高いことを表します。
Rでsummary関数、sd関数、var関数の実施
前回に読み込んだデータの集計を求めます。
> summary(body.data)
       id           gender              height          weight
 Min.   : 1.00   Length:30          Min.   :137.0   Min.   :29.00
 1st Qu.: 8.25   Class :character   1st Qu.:142.5   1st Qu.:33.25
 Median :15.50   Mode  :character   Median :149.0   Median :38.00
 Mean   :15.50                      Mean   :149.0   Mean   :38.70
 3rd Qu.:22.75                      3rd Qu.:155.2   3rd Qu.:43.75
 Max.   :30.00                      Max.   :161.0   Max.   :49.00
上記のコマンドを実行することで各列について集計関数が実行されます。
Min.は最小値、1st Qu.は順番に並べた時の上位25パーセント、Medianは順番に並べた時の中央値、Meanは平均値。
なお、genderカラムについてはFかMなので、集会関数は実施されません。また、genderカラムには「連続変数」から「カテゴリ変数」への変換処理が必要になります。
> body.data$gender = factor(body.data$gender)
> summary(body.data)
       id        gender     height          weight
 Min.   : 1.00   F: 7   Min.   :137.0   Min.   :29.00
 1st Qu.: 8.25   M:23   1st Qu.:142.5   1st Qu.:33.25
 Median :15.50          Median :149.0   Median :38.00
 Mean   :15.50          Mean   :149.0   Mean   :38.70
 3rd Qu.:22.75          3rd Qu.:155.2   3rd Qu.:43.75
 Max.   :30.00          Max.   :161.0   Max.   :49.00
上記は、genderカラムに「連続変数」から「カテゴリ変数」への変換処理を実施した後に、
集計関数を実施したものです。結果が変わっています。genderカラムがFのレコード、Mのレコードの数が表示されます。
> sd(body.data$height)
[1] 7.315548
>
>
> var(body.data$weight)
[1] 41.73448
>
上記では身長の標準偏差と不編分散を求めています。
ちなみに、標準偏差とは対象のばらつきの度合いを表します。
不編分散も対象のばらつきの度合いを表します。
Rでファイルの読み込み
自分でデータを用意し、それをRで読み込んでみる。
body_sanple.tsvをいう名前、カラムはid、gender、height、weightで30行ほど用意。
> body.data <- read.table("D:\\body_sample.tsv",header=T,stringsAsFactors=F)
> body.data[,2]
 [1] "F" "F" "M" "M" "M" "F" "M" "M" "M" "M" "F" "M" "M" "M" "M" "F" "M" "M"
[19] "M" "M" "F" "M" "M" "M" "M" "F" "M" "M" "M" "M"
上のコマンドは、Dドライブ直下に置いたファイルを読み込み、第2カラムの出力結果。左についている番号は、行の番号。
さらに下記のように、height列で降順にデータの並べ替えを行った。
> body.data[order(body.data$height, decreasing=T),]
   id gender height weight
21 21      F    161     47
2   2      F    160     49
10 10      M    160     47
3   3      M    159     45
7   7      M    158     49
12 12      M    157     39
13 13      M    157     48
25 25      M    156     44
4   4      M    153     43
23 23      M    152     35
5   5      M    151     42
11 11      F    151     42
28 28      M    151     36
19 19      M    150     43
9   9      M    149     47
17 17      M    149     36
1   1      F    148     41
30 30      M    148     38
26 26      F    147     38
27 27      M    147     30
24 24      M    145     35
14 14      M    144     36
18 18      M    142     31
29 29      M    141     30
6   6      F    140     29
22 22      M    140     33
15 15      M    139     32
16 16      F    139     34
20 20      M    139     31
8   8      M    137     31
今日はここまで。次回は読み込んだ値を計算して何らかの結果を出します。